How to Measure for a Fixed Access Ladder
Measuring correctly is one of the most important steps when ordering a fixed access ladder. A small mistake in height, parapet measurement, wall condition, or bracket stand-off can create problems during installation.
This guide explains the basic measurements and photos needed to help quote a fixed access ladder for roof access, wall access, platform access, equipment access, or other commercial and industrial applications.
At Industrial Ladder and Scaffolding, we help contractors, building owners, facility managers, and maintenance teams review fixed access ladder conditions throughout Northern California.
Before You Start Measuring
Before ordering a fixed ladder, gather as much information as possible about the access condition. The more complete the information is, the easier it is to quote the ladder correctly.
Helpful information includes:
- Overall vertical height
- Lower walking surface
- Upper landing or roof elevation
- Parapet height, if applicable
- Wall material or structural attachment
- Required ladder width, if specified
- Required stand-off distance, if known
- Roof hatch size and location, if applicable
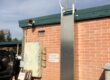
- Photos of the wall, roof edge, and surrounding area
- Project drawings or specifications
- Jobsite location
- Delivery or pickup preference
If you are not sure which measurements are needed, photos are often the best place to start.
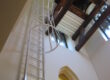
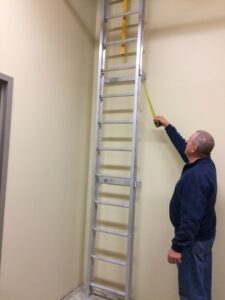
1. Measure the Overall Vertical Height
The first measurement needed is the vertical height from the lower walking surface to the upper landing surface.
Depending on the project, this may be:
- FOR ROOF ACCESS:
- Finished grade to roof deck or top of parapet wall
- Parapet wall thickness, if applicable
- Top of parapet wall to roof deck, if applicable
- Make note of any gutters
- Finished floor to roof hatch lid
- Finished floor to walking working surface
- Lower roof to upper roof or top of parapet wall
- Working platform to working platform
- Pit floor to access level
- Floor to mezzanine
- Ground level to equipment platform
Measure from the surface where the user will begin climbing to the surface where the user will step off the ladder. When accessing through a floor door or roof hatch, measure from the ground to the door or lid. The goal in this scenario is to have the rung within 12″ from the door.
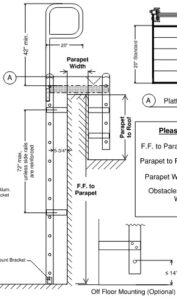
2. Measure the Parapet Height
If the ladder is going to a roof with a parapet, measure the parapet height.
The parapet height is the distance from the roof walking surface below to the top of the parapet.
This measurement matters because the ladder may need:
- Extended side rails
- Walk-thru handrails
- Return rails
- A landing platform
- A special transition at the top
- Additional clearance for safe access
A ladder that works for a flat roof edge may not work the same way when there is a tall parapet.
3. Confirm the Top Access Condition
The top of the ladder is one of the most important areas to review. This is where the user transitions from the ladder to the roof, platform, hatch, or landing.
Common top access conditions include:
- Roof edge access
- Roof hatch access
- Parapet wall crossover
- Platform access
- Mezzanine access
- Equipment platform access
- Tank access
- Side-step access
- Through-ladder access
If the ladder is accessing a roof hatch, confirm the roof hatch size, location, opening direction, curb height, and available space around the hatch.
If the ladder is accessing a roof edge or parapet, confirm whether the user will step through the ladder or step sideways off the ladder.
For more general information about ladder types and safety accessories, read our Fixed Access Ladder Guide.
4. Measure or Estimate the Required Stand-Off Distance
The stand-off distance is the space between the wall and the ladder. This distance is created by the wall brackets.
Stand-off distance is affected by:
- Wall projections
- Gutter conditions
- Roof overhangs
- Parapets
- Pipes
- Electrical conduit
- Building panels
- Required climbing clearance
- Obstructions behind or around the ladder
The ladder must have enough clearance for the user to climb safely. If the wall has projections, the brackets may need to be longer to clear the obstruction.
5. Identify the Wall or Mounting Surface
The mounting surface affects the ladder bracket design and anchor requirements.
Common mounting surfaces include:
- Concrete wall
- CMU block wall
- Structural steel
- Wood framing
- Metal building panels
- Tube steel
- Concrete tilt-up wall
- Tank wall
- Equipment frame
It is important to confirm that the ladder will be attached to a suitable structure. The ladder, brackets, anchors, and supporting structure all work together.
Attaching a ladder only to sheet metal, siding, panels, or weak backing may not be adequate unless the condition is properly reinforced or reviewed by others.
The installer, contractor, building owner, or project engineer is responsible for confirming the ladder is properly anchored to a suitable structure.
6. Check for Obstructions
Before ordering a fixed ladder, review the wall and surrounding area for anything that could interfere with the ladder or the person climbing it.
Common obstructions include:
- Gutters
- Roof overhangs
- Pipes
- Conduit
- Roof drains
- Windows
- Doors
- Light fixtures
- Security cameras
- Equipment
- Uneven wall surfaces
- Signs
- Vents
- Existing ladders or platforms
Take photos from multiple angles so the obstructions are easy to see.
7. Confirm the Bottom Access Condition
The bottom of the ladder should also be reviewed.
Confirm:
- Is the ladder starting at surface level?
- Is there enough room to approach the ladder?
- Is the ladder near a vehicle path?
- Is the ladder in a public area?
- Is a security door needed?
- Is the ladder starting from grade, floor, roof, platform, or pit?
- Is there anything blocking the bottom of the ladder?
If the ladder is accessible to the public, a security door or ladder guard may be recommended to help restrict unauthorized access.
8. Confirm Whether Safety Accessories Are Needed
Safety accessories should be reviewed before the ladder is fabricated or ordered.
Common fixed ladder accessories include:
- Walk-thru handrails
- Safety gates
- Ladder cages
- Ladder safety systems
- Rest platforms
- Landing platforms
- Security doors
- Custom wall brackets
- Roof hatch railings
- Grab rails
- Extra Long Stand Off Wall Brackets
- Step Off Platforms with Guardrails
Some accessories are selected for convenience, while others may be required by the project specifications, OSHA, Cal/OSHA, or the authority having jurisdiction.
For California projects, Cal/OSHA requirements should be reviewed along with federal OSHA standards and project-specific requirements.
Helpful references include:
- OSHA 1910.23 – Ladders
- OSHA 1910.28 – Duty to Have Fall Protection
- Cal/OSHA Title 8 Section 3277 – Fixed Ladders
This information is only a general reference and should not be treated as engineering, legal, or jobsite safety advice.
9. Take the Right Photos
Photos are one of the most helpful things you can send when requesting a fixed ladder quote.
Recommended photos include:
- Straight-on photo of the wall
- Side-angle photo showing depth and obstructions
- Photo of the roof edge or parapet
- Photo of the lower starting point
- Photo of the upper landing or roof
- Photo of the proposed mounting surface
- Photo of any roof hatch, platform, tank, or equipment being accessed
- Photo of any pipes, conduit, gutters, or obstructions nearby
Try to stand far enough back so the full ladder location can be seen. Close-up photos are helpful, but they should be sent along with wider photos.
Fixed Access Ladder Measurement Checklist
Use this checklist before requesting a quote:
- Overall vertical height
- Lower starting surface
- Upper landing or roof surface
- Parapet height, if applicable
- Roof hatch size, if applicable
- Roof hatch location, if applicable
- Wall material
- Stand-off distance, if known
- Ladder width, if specified
- Obstructions near the ladder
- Top access condition
- Bottom access condition
- Safety accessories needed
- Project drawings or specifications
- Jobsite address
- Delivery or pickup preference
- Photos of the proposed ladder location
Example: Basic Roof Access Ladder Measurements
For a typical roof access ladder, the most important measurements are usually:
- Finished grade or lower roof to upper roof surface
- Roof surface to top of parapet
- Wall material
- Required stand-off distance
- Available space at the top of the ladder
- Available space at the bottom of the ladder
- Any obstructions on the wall
- Whether walk-thru handrails, a security door, cage, or ladder safety system is required
If the ladder is going below a roof hatch, also provide the roof hatch size, curb height, and hatch location.
Need Help Measuring a Fixed Access Ladder?
If you need help measuring for a fixed access ladder, send us your photos, dimensions, drawings, and jobsite information. Our team can help review the access condition and provide a material quote.
Industrial Ladder and Scaffolding supplies aluminum fixed access ladders, roof access ladders, walk-thru handrails, ladder cages, security doors, custom brackets, and related ladder accessories for commercial and industrial projects throughout Northern California.
For a broader overview of ladder types, materials, accessories, and general Cal/OSHA considerations, read our Fixed Access Ladder Guide.
If you already know the size and product you need and want to order online for shipment, visit AnyHatch.com for available access ladder and roof hatch options.